Tuesday, July 28, 2009

What To Do?

Before I answer that question, let me show you the "folded border". I don't think this would work on most quilts, but the way this one turned out, it looks like the mat in a picture frame and it really works. You can see that it lays flat against the middle part of the quilt, which appears as the picture in the frame.

In this picture I am lifting back the fold to show that it is not "attached" to both pieces as a regular border would be. I am pleasantly surprised with the way it looks.

Once I finished the second border and layered the back, batting and quilt front and pinned them, I had to decide just how I was going to quilt this puppy. I have only done "stitch in the ditch" machine quilting thus far. I'm not confident enough in myself or in my machine to try freehand or stippling. So the first step was to stitch around all the pinwheel blocks and then around the entire quilt at the border. That left me with large triangles and one large square block in the middle. So, what to do next?

I visited a local quilting store and looked around at all the finished quilts there. One really caught my eye as it seemed to have an answer to my dilemma. They had taken buttons and string and tied the quilt in strategic places. So I began to get some ideas about buttons and set off looking for teddy bear buttons. I found these cute little bears and next to them were these blue, brown and tan buttons - just the right colors to go with the teddy material. Then I found some very narrow ribbon in blue, tan and red. Now, I just need to get a sharp, wide-eyed needle and start tying buttons! I think this will be just the right touch.


The teddy buttons will go at the apex of the pinwheels, and the other buttons on the teddy material and maybe on the border too. The final step will be the binding - more of the chambray. Hopefully it will make a nice baby gift in the not-too-distant future!

Thursday, July 23, 2009

Folded Borders

Let me just say this up front - "I love Eleanor Burns!"
Beside the fact that she has dozens and dozens of quilting patterns and designs and ideas, so far she has had the best and easiest to follow instructions I've ever seen. Each of the quilts I have made from her books have been pretty basic, although I try to challenge myself with each successive one just to boost my own skills and keep me from getting bored.

Photo #1
So I was thinking that these pinwheels were a pretty big challenge and, based on my previous post, I did hit a snag or two, but I'm an overcomer! I finished four perfect pinwheels! The next set of instructions weren't too bad. I have one large square and four medium and four small triangles. My sixty-three year old brain had to digest the instructions for placement and procedure overnight, but that, too, turned out pretty okay.
Photo #1 is the finished middle portion of said quilt.

Photo #2
The next step calls for "folded borders." I have to admit, not only have I never heard of folded borders, my little brain just couldn't grasp the whole concept of folded borders. I read and re-read the instructions. I meditated on them. I mulled them over. And I considered skipping them. But I finally decided these little bears needed folded borders to separate them from the next border. So.... now I have put folded borders around the middle of the quilt.
You can see them in Photo #2.
You'll have to wait for another post to find out exactly what folded borders do, or look like.
I need another night before I move to the next step!

Monday, July 20, 2009

Oops!

I consider myself an "intermediate" quilter and seamstress. When I was much younger I took on more challenges in sewing. I particularly remember taking "Stretch and Sew" classes with my neighbor and making all kinds of wonderful items of clothing. After an absence of twenty or more years, those skills have subsided, but I still have a good command of the basics.

So, two years ago, in anticipation of a first grandchild, I took a beginner's quilting class. It was so much fun, for it was just challenging enough to keep me moving toward my goal, but not so hard that I couldn't finish it. From that class I have produced many quilts, some for family, others for new babies. And it's been fun.

Now that my second grandbaby is on the way, I began to look for something a little different, but still in the "intermediate" category to make for him. And I decided that pinwheels would be fun. I got the idea from an Eleanor Burns book I purchased on Amazon.com. (More about her later...)

Oops!
The first block (on the left) turned out really well and wasn't all that hard. So next day I proceeded to work on block number two. There is a rule in sewing that I have a tendency to break - "Don't get cocky!" I start to think I have mastered something and then rush through some of the steps. Well, that's what I did on block #2. Look at the picture. The pinwheel on the right is moving in the wrong direction! aarrrggghhhh!

See? Block number 3 is perfect! Pinwheel is blowing in sync with Number 1. That's how it's supposed to be! Rule number two in quilting: "Always buy a little bit more material than you think you need." That's because I usually break rule number 1. So, instead of tediously ripping out the seams in block #2, I have extra material for block number 5!

This time I will be extra careful, slow down, and follow the easy instructions, making sure that pinwheel blows with the others. This is no time to get cocky.

Now, about Eleanor Burns. My quilting class was based on an easy quilt from her instruction booklet. She calls her lessons "Quilt in a Day" and there are lots and lots of patterns, from easy beginners to much more elaborate quilts than I'll ever make. I love her instructions. She has mastered shortcuts and made them very easy to follow (usually).

See? She even has pictures to follow beside her instructions!
I'm nearly done with the blocks - just one more to go. Then we'll see how to put them all together in a baby-sized quilt. Check back in a few days for updates!
About that backward pinwheel... it just may turn into a hotpad!

Friday, July 10, 2009

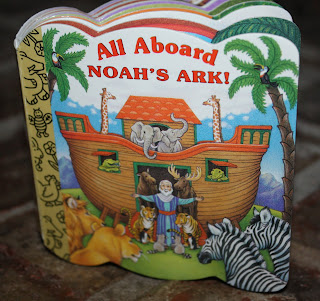
Chunky Books

Last spring I made a wonderful discovery and purchase. We were in Ft. Worth at Southwestern Baptist Seminary for a Grace Conference. I took off at lunch time and walked across to the Lifeway bookstore to look for something for Adrian. What I found were two little "board" books, one about Jonah and the Whale and the other about David and the Giant. When I returned home and showed them to Adrian he was sort of "lukewarm" about them. So I just put them with his other books and waited for his interest to peak.

Then Graham discovered them and began to read to Adrian. That's when we discovered these little windows on each page.

There's a little "slot" just big enough for little fingers to open the window.

And Papa-Ludee can really tell a good story when those windows are opened up... with sound effects and rocking motions!
After the success of Jonah and David, I went to the Lifeway store here, but I couldn't find them. So I went to my next-best bookstore, Amazon.com, and hit the jackpot. When new, these chunky books list for $3.99. That's a bargain for all the hours of enjoyment we get from them. But did you know that some sellers on Amazon actually list them for $35.00 and more? I couldn't believe it! I went for the $3.99 ones and bought three more for our library.

In addition to the Bible stories, which are all authored by Mary Josephs, the chunky books also come with farm animals, cars, trucks and such. Any of these would be perfect for curious toddlers such as Adrian.
Here is the info if you should ever want to invest in them. And Amazon.com is the way to go!

Meredith has a family pass to the San Antonio Zoo and this book has all the animals Adrian will see when they take him to the zoo. It's a great way to learn and have some quality story time with his grandpa!

Tuesday, July 7, 2009

Finished!

I'm finished with the quilt for Baby boy number 1. And I'm happy with the way it turned out. Actually, this is the second piecing for this quilt. The first one was a little too pastel, and for a baby boy, it just didn't pass the test! I used the same colors, basically, but just more bold and I think it worked this time. The Pooh pattern on the back contrasts perfectly now.

Here is my quilt-tester. Treasure has managed to position herself in all my quilt photos!

Judging from her posture, I'd say this one passes the Westie test!
Now I just need to launder it, fold it and wrap it with a bow!


Saturday, July 4, 2009

Happy Fourth!

I've been listening to the History Channel all morning. I'm amazed at how much of our American history I have forgotten over the years. It's good to have these documentaries to remind us of our great heritage. Our generation knows nothing of the sacrifice it took to become the great nation we now are.

I've also been making potato salad and cutting up melons. We're having a very small, informal family affair this afternoon. It's too hot to do much else. But it sure is nice to get my children around the table every once in a while!
Enjoy the holiday, and stop to remember what we have, and how tragic it would be to lose it all. We still have a voice and we need to use it.

Thursday, July 2, 2009

Quilting Again

It's "Baby Boy" time for the Wilson clan! Meredith's cousin and his wife are expecting their first child, a boy, in August, and Meredith and Cristian will welcome little boy Moza number two in November. One sister-in-law has two grandsons and two granddaughters. My other sister-in-law is working on her fifth grandson! They are both way ahead of me, and it looks like I'll remain at the back of the pack. That's okay because Meredith's children will have lots of cousins to play with!

Now that I know there will be "just boys" I pulled out my cutting board, rotary blades and boxes of "stash" and put together the first baby quilt. It has a little 'Winnie the Pooh' going on for the backing and some bold boy colors pulled from the Pooh pattern. Meredith and I will look through some quilt books for her "special" Ludee quilt for baby number two. I'm enjoying getting back to some meaningful sewing!